


1 // we've been budgeting! a good thing - we have savings! a bad thing - i have limited diy money (or money in general).
2 // we've run out of space. okay not true. as you all are probably just like me and your home is constantly a work in progress. but w/ a 500 square foot apartment - i have free ceiling space and that's about it! ;)
but i'm back! and i love this little project.
while at the design*sponge book signing at west elm a few weeks back, ryan and i were totally impressed w/ all of west elm's homemade inspired christmas decorations. i was especially smitten w/ their felt mistletoe tree skirt:

adorable, right? and not bad @ $70. but if you're a clearance shopper like me and waiting for after christmas discounts, you're out of luck! this cutie is "out of stock".
just in time - here's (part 1) to make your own felt mistletoe tree skirt:

supplies:
3 yards + 1 foot of 20% wool felt @ 36" wide (purchased from joann w/ 50% coupon)
yarn to match
sewing machine, scissors, measuring tape
to make the basic tree skirt:
1 // cut your felt into two 24 1/2 inch x 48 inch pieces of felt.

2 // place the two 24.5" x 48" pieces of felt right sides together and pin 1/2" seam on of the 48" sides. this will create a 48" square.
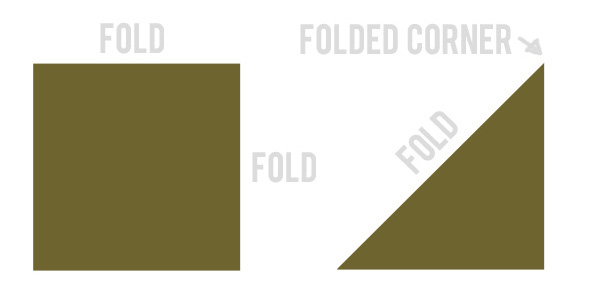
3 // fold the square into quarters (left). then fold again to form a triangle with
the folded center at point (right). measure 24" from the folded center point around the unfolded side of the triangle and cut. then cut a similar circle about 4" from the center point (making your center hole).

4 // the final step to finish the basic tree skirt. sew the 1/2" seam you had pinned in step 2. from rounded outside edge to the center hole this will be 24". be sure to back stitch at the beginning and end. remove the pins from the other 24" half.

the finished product:

time to embellish!
1 // this part is incredibly repetitive. so watch a movie and get 'er done. double up the excess fabric and cut out your "leaves". you can stick with a shape similar to the west elm mistletoe or i opted for a bit more literal holly leaf. i needed just over 100 pairs of leaves. this will depend on the size and shape you settle on.

why double up? to attach the leaves to the tree skirt we'll sew a midrib
on each leaf. i preferred the thickness and texture of the doubled up
leaves.
2 // it's decision time once again. decide how you want your leaves to lay. similar to the west elm tree skirt, i decided to make my leaves head in every direction. but you could be more planned and do a pattern. it's completely up to you.

3 // starting at one of your open ends of the skit on the right side (aka the side w/ the seam not exposing the extra 1/2" fabric), begin to attach your leaves in pairs. attach them by creating a midrib - a simple straight stitch down the center of your leaf. again be sure to back stitch at the beginning and end so that your stitch doesn't fall out. give yourself enough give in the thread to continue to the next leaf w/o cutting (see my loose threads below). this
task may appear tedious but once you get in the hang of it, it goes
rather fast.

100 or so pairs of leaves later ... and you have a lovely mono-tone tree skirt:


come back tomorrow and we'll add our berries ... (part 2) a little lesson on felting + the finished product!

3 comments :
so far your leafiness is looking MUCH better than the West Elm skirt! can't wait to see the rest!
Wau!!! Good idea!!!!!I like it!!!!
this is awesome, blair! i made a tree skirt too this year. i'll get around to posting it at some point before christmas hopefully! also, i tried my hand at felting balls. looking forward to seeing how yours turned out!
Post a Comment